Design the thicker wall before choosing its finish
External wall insulation in Macclesfield | Rendered systems
External wall insulation creates a new layer outside the existing wall, usually with a protective finish as part of a complete system. That extra thickness is central to the design. For a Macclesfield home, it affects far more than the open wall area: windows, roof edges, ground levels, ventilation and services must still work once the face moves outwards. A sound proposal makes those changes visible and assesses the building before promising a particular outcome.

On this page
Establish the construction and condition first
The appearance or age of a property does not reliably establish whether its walls are solid, cavity construction or a mixture. Extensions, infilled openings and earlier alterations can introduce different backgrounds within one elevation. The assessment should identify these areas and consider their condition. Existing water ingress, defective masonry and uncertain coatings need attention before they are concealed by an insulation system.
Moisture and ventilation belong in that assessment. Insulation should be considered as part of the building, not an isolated product added because exterior work is already planned. Energy Saving Trust's guidance explains why wall type and detailing matter, but a general guide cannot specify an individual house. Any claimed thermal performance should come from the proposed construction and appropriate assessment rather than a figure borrowed from another property.
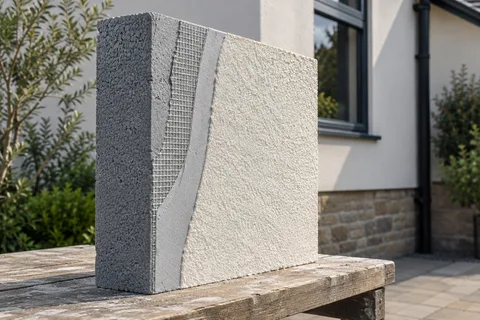
- Existing wall Prepared; fittings removed and the base track fixed above ground level.
- Insulation boards Bonded with adhesive and, in most systems, mechanically fixed to the wall.
- Basecoat with mesh Reinforcement mesh embedded across the board joints and around openings.
- Primer Where the system requires it.
- Finish render A thin-coat finish that weatherproofs the insulation.
Wall on the left, finish on the right. Not to scale: coats, thicknesses and primers follow the chosen manufacturer’s system and the condition of the wall.
Draw the thickness at the difficult places
A plan or section through a window can show what a written description hides. It reveals the depth of the new reveal, the sill projection and the junction between the system and the frame. A similar drawing at the eaves or verge shows whether the roof detail accommodates the new wall face. These interfaces should be resolved before products are ordered or a finish is selected.
At the bottom of the wall, changes in paving and ground level may mean that one detail cannot simply be repeated along the entire elevation. The system base needs to suit the construction and drainage arrangement. Vents and other openings must remain functional. Our article comparing insulated and uninsulated options explains how placing both arrangements on the same drawing makes the differences easier to evaluate.
| Location | Detail to resolve |
|---|---|
| Window | Reveal, sill projection and junction with frame |
| Roof edge | Relationship between insulation and roof weathering |
| Base | Support, ground relationship and system termination |
| Services | Safe extensions, mounting positions and access |
| Ventilation | Openings retained and properly detailed |
Include the fittings that sit on the wall
Downpipes, lights, cables, alarm boxes and other attachments may need alteration or a different mounting arrangement. The design should say which items remain, which move and which require a specialist trade. It should also consider access for maintenance after the system is installed. Burying a fitting or relying on an improvised bracket is not an adequate substitute for a coordinated detail.
Roof and window work can affect the installation sequence. If either is planned, decide how the trades will meet and who signs off the underlying junction before it is covered. The insulation contractor should not be left to resolve an unfinished roof edge on the day the boards arrive. A clear responsibility schedule is especially useful when the homeowner has separate contracts with several trades.
Compare the complete system
The insulation material, attachment method, reinforcement, basecoat and decorative finish form a specified assembly. Product names from unrelated systems should not be mixed casually to create a cheaper-looking list. The proposal should identify the relevant system and its suitability for the building, including the required fire and other performance considerations. Any supporting certification must relate to what is actually proposed and its intended use.
The final texture might resemble a silicone-rendered wall, but the insulation installation has additional design and execution requirements. A render-only quotation and an insulation quotation therefore cannot be compared simply by the name of their topcoat. The house rendering page gives the broader exterior coordination context; the insulation package should state the extra work created by its thickness and complete build-up.


Keep predicted benefits specific to the assessment
Insulating a suitable wall can improve its thermal performance, but the result for a particular building depends on the existing construction, the design and how the building is used. Generic annual savings do not establish what this project will achieve. If performance calculations form part of a proposal, retain their assumptions and scope so the figures can be understood rather than treated as an unconditional promise.
The comparison should also include practical consequences. A deeper reveal may affect appearance or the way an opening is used. Altered rainwater fittings may need future access. Retained stone or brick details can require careful design if they are not to be covered. These are reasons to compare options in detail, not reasons to assume insulation is either always desirable or always unsuitable.
Inspect before important layers disappear
Agree sensible inspection and documentation stages with the designer and installer. Once the decorative finish is complete, underlying attachments and junctions may no longer be visible. A record of the relevant stages helps establish what was installed and supports later maintenance. It should follow the actual system requirements rather than become a collection of generic photographs with no identified location.
At handover, obtain the system details, care instructions and guidance for future attachments or alterations. Later work through the façade should respect the installed build-up. Where repairs are subsequently needed, the repairer needs to know that this is an insulated system rather than ordinary render on masonry. For commercial buildings, responsibilities for inspection and maintenance should also be clear to the person managing the premises.
Common questions
Can insulation be added to any wall that needs rendering?
No. Wall construction, condition, moisture behaviour and the wider building need assessment. The proposed system must be appropriate for the substrate and the design. Existing defects may need repair first, and some buildings require a different approach. A rendering enquiry alone does not establish insulation suitability.
Will the finished house look the same except for its colour?
Not necessarily. External insulation moves the face of the wall outward, affecting reveals, sills, roof edges and attached fittings. Those changes can alter the proportions of details even when the colour stays similar. Drawings and samples help make the consequences visible before the specification is agreed.
See housing and planning information for Macclesfield and nearby places, including the source and geography behind each figure.